
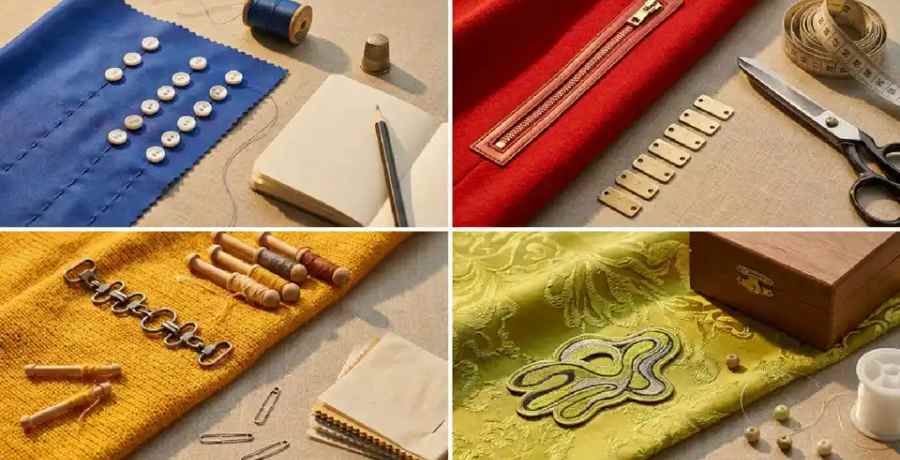
Node-based workflows give technical users granular control over AI model steps, while guided checkpoints offer a structured, task-specific process for creative and production teams. This post examines how each system impacts key pre-production stages, from initial concept generation to digital material sampling. We analyze how each workflow affects collaboration between design, merchandising, and production, specifically looking at review cycles and handoffs for the tech pack. We provide evaluation criteria and buyer-focused questions to assess how each type of software supports your brand's existing approval routines and product development cadence.
Guided checkpoints present task-focused steps, built-in approvals, and role-based outputs. This approach makes sampling, grading, and handoffs repeatable without coding. This article helps brand operators decide which workflow reduces review cycles, preserves creative intent, and integrates with PLM and approval routines. It includes practical evaluation criteria and buyer-focused questions to test vendors.

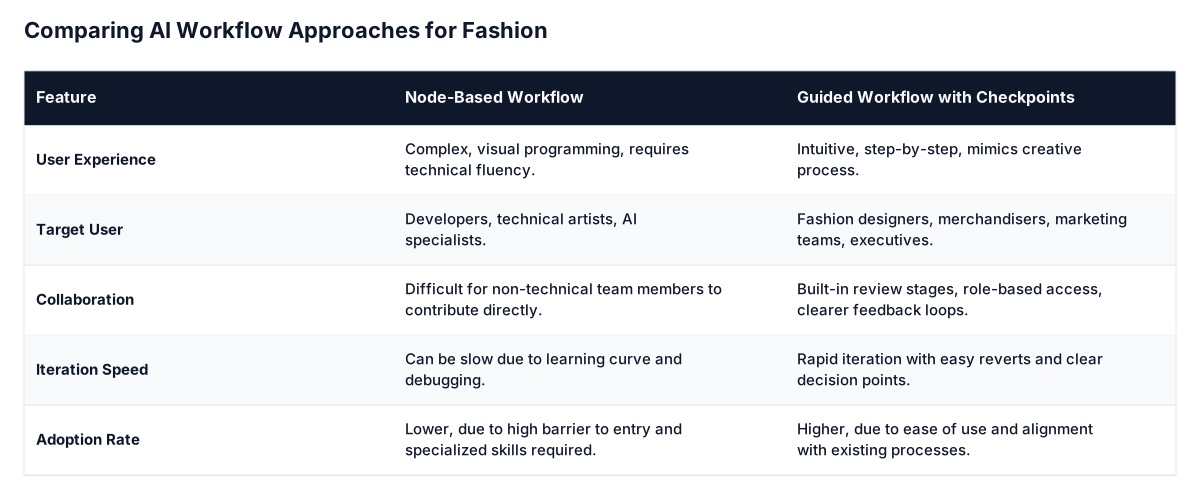
Node-based interfaces, often seen in software for visual effects, game development, and some AI model builders, connect "nodes" representing specific operations (e.g., image input, apply filter, generate texture) with "wires" dictating the flow of data. For a developer or a technical artist, this visual programming model offers immense flexibility and control. You can see the entire computational graph, debug complex interactions, and craft highly customized solutions.
However, for a fashion designer, merchandiser, or marketing professional, this level of technical detail is often unnecessary and overwhelming. Their expertise lies in aesthetics, trend forecasting, brand identity, and consumer psychology, not in understanding data pipelines or debugging graph logic. Presenting them with a maze of interconnected boxes and lines diverts their focus from creative output to technical interpretation. This stifles the innovation AI is meant to support.
The core issue is a mismatch between the tool's design philosophy and the user's operational needs. Fashion teams need tools that improve their existing workflows, not force them to learn a new programming model. The mental load required to navigate a node graph detracts from the creative process and slows down iteration, a critical aspect of fashion design and development.
Instead of abstract node graphs, fashion teams thrive on guided workflows. Imagine a step-by-step process, clearly defined at each stage, that leads to a desired outcome. This could be anything from conceptualizing a new print to generating 3D garment visualizations or drafting marketing copy. Each step offers specific, relevant choices and clear feedback, building confidence and accelerating progress.
Checkpoints are another essential component. These act as natural stopping points in a workflow, allowing teams to review progress, make adjustments, and ensure agreement before proceeding. In fashion, where collaboration and iterative refinement are key, checkpoints facilitate critical feedback loops. A designer can generate several initial concepts, present them for review, receive feedback, and easily revert to an earlier stage or branch off into a new direction without losing previous work.
Think of it like a well-designed design sprint or a product development roadmap. Each phase has clear objectives, deliverables, and approval gates. AI tools should mirror this structure, providing intuitive navigation and ensuring that creative decisions can be made at critical junctures, not buried in a complex technical diagram.
Designer or merchandiser? Replace the spreadsheet handoff.
The F* Word generates moodboards, factory-readable tech packs and sampling notes in one workflow, so creative, production and merchandising stay matched. Free to try.
To understand the practical difference between these two approaches, consider a common task for a design team: developing a new floral print for a women's summer dress. The goal is a unique, on-brand print that is ready for production sampling.
A technical artist or a technically-minded designer would tackle this by building a visual program. The process might look like this:
If the print has the wrong colors, the designer must insert a `ColorCorrection` node and manually adjust RGB values. If the layout is poor, they must go back to the `KSampler` and experiment with the `seed` number. This workflow forces the creative user to think like a developer, debugging a machine's process instead of focusing on the artistic goal.
Using a guided tool like The F* Word, a designer follows a process that mirrors their natural creative flow. The focus remains on the design itself, not the underlying technology.
Fashion teams are inherently collaborative and made up of diverse roles: designers, pattern makers, merchandisers, marketers, and executive stakeholders. Each role needs different types of information and different levels of access. A single AI workflow, when properly designed, should be able to deliver role-based outputs tailored to each user's needs.
For example, a designer might need high-fidelity 3D renders with material simulations, while a merchandiser might require data visualizations of predicted sales for different colorways. A marketing team might need automatically generated copy suggestions and imagery for social media. An useful AI system anticipates these varied needs and presents information in the most consumable format for each user.
smooth approval processes are non-negotiable. Instead of needing to extract files and send them through separate communication channels, AI-powered platforms can integrate approval flows directly. This means stakeholders can view, comment on, and approve designs, marketing assets, or product decisions in the same system. This reduces friction and speeds up time-to-market. Transparency and accountability are also greatly improved when approvals are clearly tracked in the workflow.
Choosing the right AI tool requires looking past feature lists and focusing on how the software fits your team's actual work. Use these questions to evaluate vendors and determine if their solution will accelerate your process or create new bottlenecks.
A guided AI workflow turns the complex, error-prone process of creating a tech pack into a series of structured, collaborative steps. Here is how a team might build a tech pack for a new knit sweater using a platform like The F* Word.
A designer starts a new project named "FW25 Women's Cable Knit Sweater." They begin by building a digital moodboard inside the project. They upload inspiration images of chunky knits, define the target customer persona, and input keywords like "oversized fit," "coastal grandmother," and "recycled wool blend." The AI uses this context to inform all subsequent steps.
The designer selects a base block from a library of digital garments (e.g., "crewneck sweater") or uploads a technical flat sketch. Using simple text prompts, they instruct the AI to modify the silhouette: "add a 4-inch ribbed cuff and hem," "create a saddle shoulder," "make the body width 2 inches wider." The AI generates several visual options of the sweater, which the designer can review instantly.
Next, the designer specifies the materials. They select a "7-gauge wool-cashmere blend" from the system's digital material library. They define the season's colorways: "Heather Grey," "Oatmeal," and "Navy." The AI applies these colors and textures to the 3D model of the sweater. The system automatically notifies the merchandising team that colorways are ready for review. A merchandiser logs in, compares the colors to sales data from the previous season, and leaves a comment: "Let's replace Navy with a deep Forest Green." They approve the other two. The designer gets the note, makes the change, and the colorway is finalized.
A technical designer takes over to add construction details. They add annotations directly on the 3D model or in a checklist, specifying "fully fashioned construction," "linked seams," and "half-milano stitch for the collar." As they add details, the AI helps populate the Bill of Materials (BOM). It identifies the main yarn, and the technical designer adds the specific woven main label and care label for this garment.
The technical designer enters the sample size measurements for the sweater. They then apply a pre-set grade rule for knitwear. The system automatically calculates the full measurement chart for the entire size range (XS to XL). The tech pack's measurement page is now complete. The system notifies the pattern maker that the grade is ready for a final check. They review the numbers and approve the spec.
With all checkpoints approved, the platform's job is nearly done. A user clicks "Generate Tech Pack." The system instantly compiles all the information, the initial moodboard, 3D renders, flat sketches, BOM, construction callouts, and graded measurement chart, into a single, professional tech pack document. This PDF or spreadsheet is clean, consistent, and contains all the information a factory needs to produce a first sample. The file can be downloaded or sent directly to a sourcing agent from the platform, with a complete history of who approved each step.
At The F* Word, we understand that powerful AI does not need to be opaque or overly complex. Our philosophy is rooted in building AI tools that smoothly integrate into the daily lives of fashion professionals, improving their innate creativity and strategic thinking rather than challenging their technical prowess. We believe in providing AI solutions that feel like an extension of the design studio or the marketing department, not a separate, intimidating technical challenge.
This means prioritizing user experience above all else. Our development focuses on crafting intuitive interfaces, clear progression paths, and intelligent automation that handles the technical heavy lifting behind the scenes. We're building for the fashion industry's specific rhythm and demands, recognizing that speed, accuracy, and creative freedom are paramount.
By moving beyond generic AI interfaces and embracing guided workflows, clear checkpoints, and role-based permissions, we empower entire fashion teams to use AI correctly. This goes beyond about making tools easier to use. It is about unlocking new levels of collaboration, accelerating discovery, and finally, delivering better products to market faster and more efficiently. The future of AI in fashion is not about code. It is about creativity, enabled by intelligent design.
A node-based workflow uses a visual programming interface where "nodes" represent functions or operations (e.g., inputting an image, applying a style, generating a new asset). "Wires" connect these nodes to define the flow of data and execution. It gives technical users deep control for custom tasks but is often too complex for non-technical creative professionals.
Fashion teams, comprising designers, merchandisers, and marketers, often lack the specialized technical skills to manage complex visual programming environments. Their focus is on creative output and brand strategy. Node-based systems can distract from these core functions, creating a steep learning curve that slows down creative iteration and decision-making.
Guided workflows offer a clear, step-by-step process that matches natural creative and business operations, making AI tools intuitive. Checkpoints provide planned review opportunities, allowing teams to collaborate, provide feedback, and make decisions before proceeding. This structure ensures agreement and reduces errors early in the process.
Role-based outputs ensure each team member gets information tailored to their job. A designer sees high-fidelity 3D renders. A merchandiser sees sales projections for different colorways. A marketer gets campaign-ready assets. This customization makes AI output directly usable for everyone, boosting efficiency and encouraging adoption throughout the organization.
Yes, but customization works differently. Instead of rewiring nodes, good guided systems allow administrators to configure the workflow steps, define approval chains, and build templates for specific product categories (e.g., a "Basics" workflow vs. a "Denim" workflow). The F* Word allows for custom templates and role configurations to fit a brand's unique operational needs, making the guided process flexible without adding complexity for the end-user.
A node-based system has specific applications. It can be valuable for specialized research and development, such as creating a completely new digital material simulation or for a technical team building proprietary automation tools. For the daily work of most design, merchandising, and production teams, it is usually too complex and slow to be practical.
Guided workflows support creativity by giving it structure. Instead of an infinite blank canvas which can be intimidating, they provide a starting point and clear methods for iteration. For example, at a "Concept Generation" step, a designer can create dozens of variations quickly and compare them side-by-side. They can save the best options to different branches of the project. This organized approach prevents creative work from getting lost and makes it easy to present clear options for review.
A Product Lifecycle Management (PLM) system is mainly a system of record. It stores the final data about a product, such as final tech packs, costing, supplier details, and production timelines. A guided workflow tool like The F* Word is a system of creation and collaboration. It is the platform where the initial design, sampling, and tech pack are built. The F* Word connects the creative front-end to the production back-end, generating the accurate data that will eventually live in the PLM. Many brands use both: The F* Word to accelerate the design-to-tech-pack process, and the PLM to manage the product during mass production and beyond.
Embracing AI in fashion means adopting tools that truly understand and support the industry's unique demands. It is about moving from technical complexity to creative empowerment, ensuring that every member of your team can harness the full potential of AI without becoming an AI expert. The future is bright for fashion AI, but only if we build it with the user in mind.
About the author
The F* Word Editorial · Fashion workflow team
Written by The F* Word editorial team. We build AI fashion workflow software grounded in thousands of industry-produced tech packs and proprietary garment records, so what reaches the factory is consistent, reviewed, and tied to design intent.
Once the workflow is in place, these are the steps that turn it into shipped product.
Related: Explore the related workflow · Read the related guide · Try The F* Word
Get The F* Word workflow insights in your inbox.