
Language
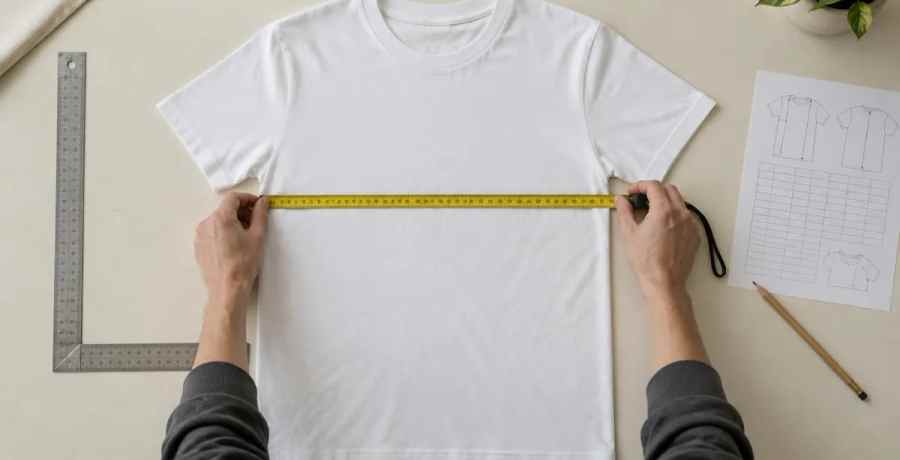
Sample rooms teach how to measure garments with one method: lay the piece flat on a hard table, close every fastener, and run the tape between fixed landmarks such as the high point shoulder and the armhole seam. Record widths as half measurements, then compare each point against its tolerance. The F* Word writes those methods into every tech pack it generates.
A measurement is only useful if a second person, in another country, can take it again and land on the same number. This guide covers the flat method used in sample rooms and QC labs, the points of measure for tops and bottoms, the tolerances brands start from, and the checks that catch a bad sample before it turns into a bad bulk order. If you need the background on where these numbers live, the pre-production workflow guide covers the full handoff to the factory.
Garment measurements describe the finished product: a chest width, a body length, an inseam. Body measurements describe the person who will wear it. Size charts on retail sites often mix the two, and factories only build to the first kind. A spec that says "chest 21 1/4" without saying where the tape sits invites the factory to pick its own spot.
The problem is old and well documented. A North Carolina State University study by Su-Jeong Hwang and Cynthia Istook compared the body measurement terms in ASTM D5219 and ISO 8559 and found that only 11.3% of the terms shared both the same name and the same method. Another 45.2% of the measurements used in industry and education references had no matching term in either standard. If the published standards disagree that often, two companies working without a written method will disagree more.
ISO 18890:2018, the international standard for garment measurement, exists to close part of that gap. It runs to 60 pages, defines the main measurement points for set-in and raglan sleeves, trousers, joggers, skirts, dresses, bras and even hats, and was last confirmed by ISO in 2024. It also allows brands and factories to agree extra points between themselves, which is what most tech packs do.
You need four things: a fiberglass tape measure, a metal ruler or L-square for short points under 6 inches, a flat table larger than the garment, and the spec sheet you are checking against. Cloth tapes stretch with use and start to read long, so most QC teams replace them on a schedule or switch to fiberglass. Pick one unit per style and stay in it. Converting a 1/8 inch reading into centimeters halfway down a spec sheet is how rounding errors creep into a fit comment.
Prepare the garment before the tape touches it. ISO 18890 asks for the piece to be laid flat on a clean, even surface with fasteners closed and folds smoothed out without pulling the fabric. In practice that means buttoning the shirt, zipping the fly, and patting the panels flat from the center outward. A jersey T-shirt that has been tugged straight on the table reads longer than one that has been allowed to relax, because knit loops open up under tension.
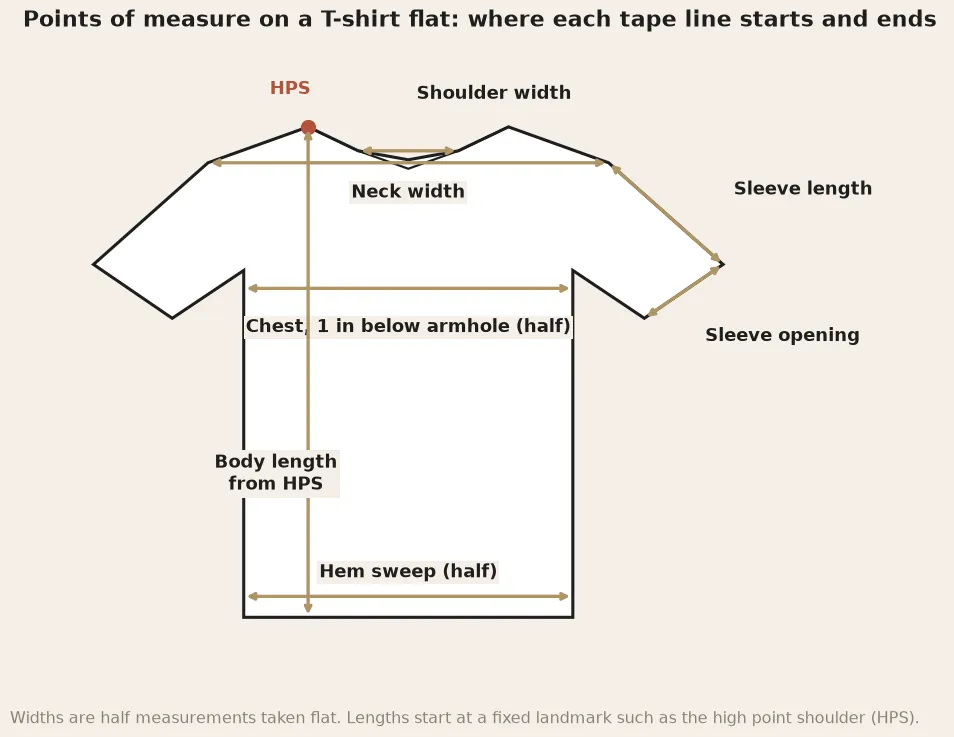
Almost every width on a spec sheet is a half measurement. You run the tape over the front of the garment, edge to edge, while it lies flat. A chest of 21 1/4 inches flat equals 42 1/2 inches around the body. Write "half" or "flat" in the point name or the column header, because a factory that reads a flat number as a full circumference will cut a garment half the intended width.
Every length starts at a landmark that does not move. ISO 18890 calls the main one the side neck point, which most American spec sheets call the high point shoulder, or HPS: the spot where the shoulder seam meets the neckline. Other common anchors are the center back neck, the shoulder point at the end of the shoulder seam, the armhole join at the underarm, and the crotch seam junction on bottoms.
Measure in a straight line unless the method says otherwise. Body length from HPS runs straight down, parallel to the center front, to the hem edge. It does not follow the curve of the front panel. Sleeve length on a set-in sleeve runs from the shoulder point along the top fold to the sleeve hem. On a raglan sleeve there is no shoulder seam to start from, so ISO 18890 treats raglans separately and most brands measure from the center back neck instead.
The table below lists the points most brands use on a T-shirt, a woven shirt or a pair of trousers, with the start and end of each tape line. The tolerance column gives example starting values that many technical designers use for a cut and sew style. They are examples and carry no standard behind them, so set your own by category, fabric and price point.

Small points get tight tolerances because a quarter inch matters more on a 7 inch neck than on a 28 inch body length. A neck width that grows by 3/8 inch changes how the collar sits and whether it gapes at the back, while a body length that grows by the same amount is hard to see on a person.
Stretch garments need two readings at some points. A knit waistband or a rib cuff is measured relaxed, lying flat with no tension, and then extended, pulled gently until the fabric stops giving. The relaxed number tells you how the garment looks on the hanger. The extended number tells you whether it will go over a hip or a fist. Joggers and leggings get their own section in ISO 18890 for this reason.
Write the state into the point name, as in "Waist relaxed (half)" and "Waist extended (half)". If the spec only says "waist", a factory measuring a pull-on short will usually report the relaxed number, while your QC partner may report the stretched one, and you will spend a sample round arguing about a garment that was made correctly.
Resellers, vintage sellers and customers use a shorter set of measurements. Pit to pit is the most common: the width of a top laid front up, from one armpit seam to the other, with the garment flat. Double it for a rough chest circumference. It is close to the factory chest point but taken at the armpit itself instead of 1 inch below, so a reseller listing and a spec sheet can quote different numbers for the same shirt.
Other retail measurements follow the same flat logic. Length is usually taken from the top of the shoulder at the collar to the hem. Waist on jeans is the flat width along the top of the waistband with the button closed, doubled. Inseam runs from the crotch seam to the hem along the inside leg. If you publish a size guide for customers, state which method you used next to the numbers. Shoppers compare your chart against a shirt they already own, and a mismatch in method shows up as a return.
When a proto or fit sample arrives, measure every point on the spec, including the ones that look right. Write the measured value next to the spec value, calculate the difference, and mark anything outside tolerance. The chart below is an example of one size M T-shirt checked this way. Five points pass. Body length came back 3/4 inch short against a 1/2 inch tolerance, and neck width came back 3/8 inch wide against a 1/4 inch tolerance.
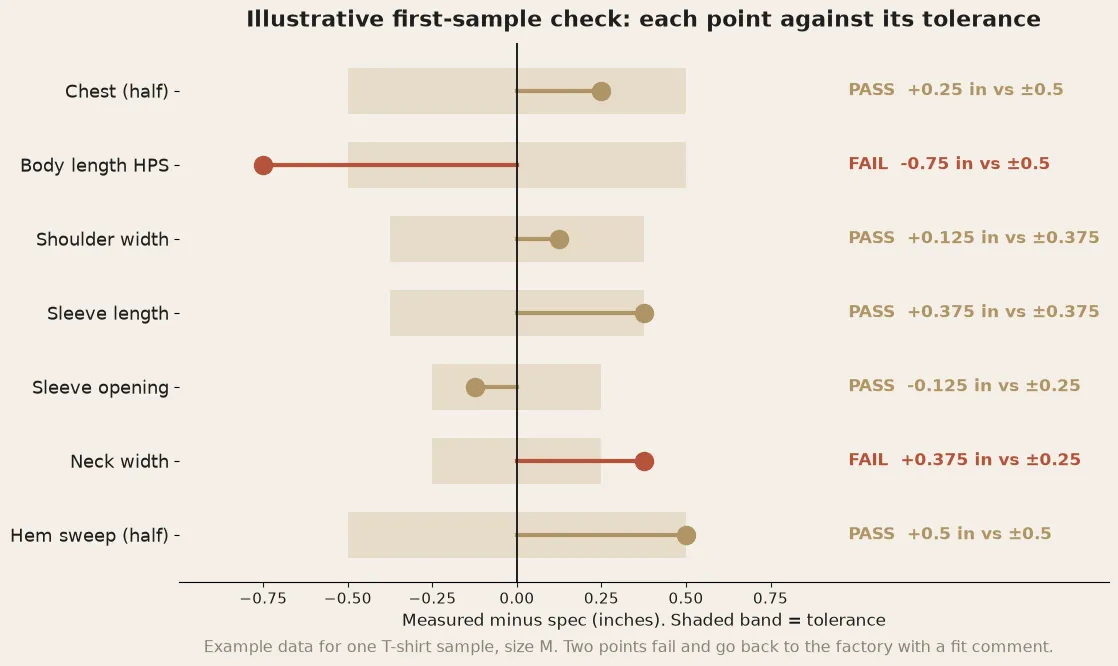
Each failure becomes a line in the fit comment sheet with the point code, the measured value, the spec and the fix you want. A fit comment sheet that names the point and the number gets fixed in one round. A comment that says "body feels short" gets a guess. If several points fail in the same direction, check the pattern before blaming the sewing line, because a shrinkage allowance that was set too low will push every length short at once.
Graded sizes need the same check. A sample in size M can pass while the XL fails, because a grade rule that is off by 1/4 inch per size has drifted a full inch by the time it reaches the fourth size up. Measuring at least the smallest and largest sizes in the run catches most of these. Our guide to grading rules covers how to set the increments in the first place.
Most of these errors come from a missing method. A vague spec lets two careful people take two different readings of the same point. If each point on your spec names its start, its end and whether it is a half or full reading, the error rate drops before anyone picks up a tape. Our checklist of POM accuracy checks covers the spec-side review in more detail.
The F* Word generates a factory-ready tech pack in 8 to 10 minutes from a sketch, photo or brief. The measurement page includes a code, a written method and a tolerance for every point of measure, plus a grade for every size in the run, so the factory reads "chest 1 in below armhole, half, ±1/2 in" instead of "chest". You can edit any value before it goes out, and the same tech pack carries the bill of materials and construction notes.
Software cannot hold the tape on your physical sample. You still lay the proto flat and measure it. What changes is the work around it: the spec you compare against is complete on day one, written in the factory's terms, and every comment you send back points at a named point of measure. The F* Word works before or alongside your PLM and does not replace it. If you want to see the whole document, our walkthrough of making a tech pack with AI goes page by page.
Related: tech pack vs spec sheet · POM accuracy checks · fit comment sheet · knit vs woven fabric
Lay it on a hard table with fasteners closed and panels smoothed without stretching. Measure widths over the front, edge to edge, and record them as half measurements. Start every length at a fixed landmark such as the high point shoulder.
HPS stands for high point shoulder, the point where the shoulder seam meets the neckline. ISO 18890 calls it the side neck point. Body length on most tops is measured from HPS straight down to the hem.
Close, but not identical. Pit to pit is taken at the armpit seams. A factory chest point is usually taken 1 inch below the armhole join, so the two numbers can differ on the same top.
Many brands start around ±1/2 inch for large points such as chest and body length, and ±1/4 inch for small points such as neck width and sleeve opening. Tighten them for fitted or premium styles and loosen them for stretch fabrics.
The F* Word writes the measuring method, spec values, grade and tolerances into a tech pack in 8 to 10 minutes. Someone still measures the physical sample with a tape, then checks each reading against that spec.
Get The F* Word workflow insights in your inbox.